Issue 04 · The Plan & the Plot
My Garden Plan
List what you eat, sort by harvest window, and refuse the myth of “plant it and it will grow.”
Now that I have my soil all prepared for planting (see last article on soil preparation), I am ready and eager to get planting.... But what am I going to plant? And where should I plant it? And how much of it should I plant?... Hmm, maybe I am not as ready as I thought, but I am still eager.
One of the most common mistake people make in gardening is rushing in to it without a plan. Creating a simple Garden Plan will help insure you are growing the right crops, at the right times, in the right places, and in the proper quantities.
There is nothing more frustrating than watching all of your hard work go to waste, or your crops rot because of a lack of direction. With a garden, it is never a case of "plant it and it will grow.” A garden is a continual time intensive endeavor. It is a true labor of love, but one that pays you back for all of your hard work, with tasty food. Remember, “If you fail to plan, you plan to fail.”
To create a Garden Plan, start by listing all of the crops you want to grow. Make sure that these are things that you will actually use, and foods that you are already familiar with. Planting a garden full of something you end up not liking is a terrible waste of space and effort. A garden is a poor place to experiment with your likes and dislikes; grocery stores are great for that.
Here is the list of crops I will plant in my garden… Peas Radishes Beets Corn Carrots Onions Potatoes Watermelon Muskmelons Tomatoes Peppers
Now that I have decided what to grow, let's tackle the when. Since all crops do not mature at the same rate, and since crops have different grow characteristics, it would not be wise to plant all of our crops at the same time.
Fall can be a busy time in the garden; the harvesting and preservation of crops requires quite a bit of time. To help reduce this fall workload, with a little planning, we can divide up the planting and thus the harvesting of some of our crops. So instead of spending two full weeks in the fall trying to harvest all of your garden's vegetables at once, it can be spread out over course of the summer and fall.
The easiest way to divide up our crops is to sort them in to three separate groups based off of harvest time: early season crops, middle season crops, and late season crops. While most crops will naturally fall in to one of these categories, we do have a little bit of leeway with some crops as to when we can harvest them. The specific types of seed used, or special growing practices can in some cases alter a crops standard placement in to one of these categories. This can be a very useful tactic that will help divide up the harvest of your garden.
For example, notice that I have decided to plant tomatoes in my garden. Tomatoes are normally considered a late season crop, but I want to enjoy fresh tomatoes the first of June. Tomato plants take about two to three months to mature and produce fresh fruit. So, if I want fresh tomatoes in June, I would have to plant them the first of April. But tomatoes are not at all a frost tolerant plant, so planting in late March or early April would be very risky. The slightest frost can leave the plant fruit barren all season. So how can this be accomplished? Tomatoes can be planted as early as the end of February if they are protected by a little-known device called a “Wall of Water”. Wall of Waters are a light permissive protective cover that protects plants from frost while still allowing the plant to grow. We will talk more about these covers in a future article.
Since, as you can see from the tomato, there are many different tactics that can be used to divide up your crops, let me make some recommendations, of the more standard practices, based off of my 70 plus years of gardening experience.
Early season crops are plants that are typically more tolerant to frost and the colder spring weather. For example, peas are very frost tolerant. They can endure a very cold spring frost with little or no damage, as long as they are not in bloom. Also, peas grow better in the cooler temperatures of the spring and early summer. Therefore peas make an excellent early crop. I would say that the best early season crops are... Peas Radishes Onions Carrots
Middle season crops are those crops that require long maturation periods such as onions, and corps that are not frost tolerant. The best middle season crops are… Beets Corn Peppers Beans Lettuce
And finally, melons and squash are good examples of a late season crop since they are not frost tolerate plants, but thrives it the hotter temperatures of the summer sun. They also have a shorter maturation period and do not require all summer to develop. Therefore, the late season crops include… Melons Squash Potatoes Tomatoes
Use the follow table to help determine the correct growing season for the crops on your list. Also, make a mental note of each crops life span.
All Rows 30’ Long Crop When To Plant Plant Spacing Row Spacing Maturation Peas 1st week of March Feed the birds 14" patch 8 Weeks Beets 1st week of March Thick 21" apart 4 Weeks Radishes 1st week of March Thick 21" apart 2 - 3 Weeks Carrots 1st week of March Thick 21" apart 6 Weeks for Baby Carrots Onions 1st week of March Thick 21" apart 8 Weeks for Small Onions Corn 2nd week of April 3 seed/hole 1' apart 21" apart 5 Weeks Peppers 2nd week of April 21" apart 21" apart 5 Weeks Melons 4th week of April 15' apart 15' apart 9 Weeks Tomatoes 4th week of March 6' apart 6' apart 8 Weeks Potatoes 4th week of April 27" apart 27" apart 20 - 24 Weeks Cucumbers 2nd week of April 6' apart 6' apart 6 Weeks Squash 4th week of April 15' apart 15' apart 6 Weeks Broccoli 2nd week of April 27" apart 27" apart 8 Weeks Beans 2nd week of April 3" apart 21" apart 6 Weeks Lettuce 2nd week of April 27" apart 27" apart 6 Weeks Eggplant 2nd week of April 27" apart 27" apart 8 Weeks Table SEQ Table \* ARABIC 1: Common Garden Crop Data Now that we have our timeline down as to when to plant what, let's move our focus to the where to plant what. This requires a little bit of strategy on our part. Let's begin this step by sketching out our garden plot on a piece of paper.
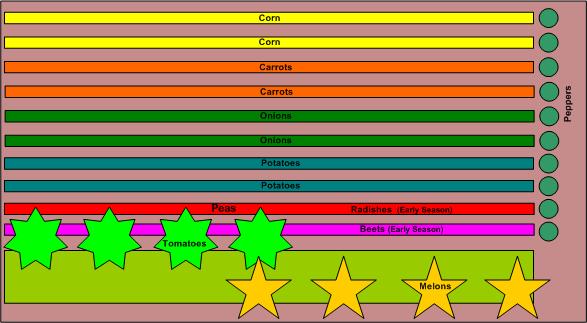
Figure SEQ Figure \* ARABIC 1: Steve's Garden Plan Now let’s look at the list of crops we made a few minutes ago. Notice how peas are considered an early crop with a short life span. They are known as a FIFO plant (First In, First Out). Since they are one of the first planted crops in our garden, and one of the first harvested, the space they occupy may be utilized later in the year by future crops.
For example, notice on my sketch (Figure #1), I have my positioned my tomatoes and melons very close to the area where my peas, beets, and radishes will grow. I have done this, so as these mid and late season crops begin to mature, they will be able to freely occupy the area that was once utilized by the peas, beets, and radishes; since by this time my peas, beets, and radishes will have been harvested and their crop waste removed from my garden.
By paying attention to the growth patterns and life spans of all of the crops in your garden, you will be able to carefully plant your garden in such a way as to maximize the space you have available.
Along with this step, it is a good idea to think about how much of each crop you should plant. Do I need two rows of carrots or just one? Do I need six tomatoes plants or do I only need three? As you can see, the answer to the question, “How many do I plant?” is dependant upon the amount of crop yields you will use, plus the amount you want to store. You also have to take in to consideration how much an average plant will produce.
To help understand expected crop yields, look at the follow chat. Crop Crop Yields Peas 35 1qt bags @ 2 1/2 cups/bag Beets 15 bunches Radishes 15 bunches Carrots 15 bunches Onions 16 bulbs Corn 50 1qt bags @ 2 1/2 cups/bag Peppers 15 / plant Melons 15 / plant Tomatoes 30 / plant Potatoes 5 – 5 gal buckets Cucumbers 40 / plant Squash 15 / plant Broccoli 1 head / plant Beans Lettuce 1 head / plant Eggplant 5 / plant Table SEQ Table \* ARABIC 2 Crop Yields For example, if I have a family of three and peas are a crop that I want to eat fresh from my garden and something I want to add to my food storage, I would plant a 14”x30' section of peas. This should yield enough peas for both my summer consumption, and some to put away for a rainy day.
Something else to consider in the layout of your garden is the accessibility of your crops. Did you design your garden in such a way that you have pinned the corn in behind the tomatoes? Will you need a machete in order to pluck a few cobs of corn for dinner? Or are things laid out in such a way as to easily access each crop with out taking a weekend safari?
The last thing to keep in mind in the design and layout of your garden, certain crops deplete the soil of standard nutrients. If these crops are planted in the same soil year after year, crop yields and quality will greatly suffer.
But not to worry, there are several things we can do to avoid this degradation in soil quality. To start with, we can add fertilizer or manure to the soil each fall to offset this natural depletion by the crops. But more importantly we can change the location of our crops each year to a different area of our garden, given the soil a rest from that kind of plant. This tactic is known as Crop Rotation.
An example of a crop that causes soil nutrient degradation is corn. Corn is notorious for depleting the soil of nitrogen. Unless we add large amounts of a nitrogen rich fertilizer to the soil each year, our corn yields will suffer. This exact problem, only with wheat, is considered to be one the main reasons for the "Great Dust Bowl" incident of the early 1900's. Now days, farmers employ crop rotation methods and better fertilization tactics to avoid another catastrophe.
So how does rotating crops help avoid soil degradation? Let’s go back to the example of corn. Since corn robs the soil of nitrogen, is there a crop then adds nitrogen back in to the soil? There is. Legumes like peas and alfalfa add nitrogen back in to the soil as they grow. Therefore, by alternating the planting of our corn with our peas in the same space in our garden, we naturally help our soil to main proper nutrient levels.
Now that I have a prepared a proper plan for my garden, I think I am finally ready to start planting. In our next issue of Steve's Garden, we will discuss the planting of our early season crops. Until then, keep those thumbs green.
“With a garden, it is never a case of “plant it and it will grow.””
My Garden Plan
Planting windows (temperate home plot)
Staggered crops spread harvest labor across the season.